Contents:
- Introduction
- IPMICFG
- How to launch IPMICFG
- Using IPMICFG
- Network configuration
- Power control
- Factory reset
- FRU
- System event log
- User management
- Conclusion
Introduction
In this 'IPMI how to' series we are continuing to look at various functions of the Intelligent Platform Management Interface (IPMI) server management protocol, focusing on Supermicro hardware. To recap, Supermicro’s IPMI is a powerful server monitoring protocol using a Baseboard Management Controller (BMC) chip embedded on server motherboards. Using IPMI is something every datacentre admin should be familiar with when using Supermicro hardware. It can allow one to fully manage a server remotely if they have an Internet/Network connection to the hardware.
Our previous article in this series focused on IPMI setup and how to use the Web GUI.
Here, we will look at Command Line Interface (CLI) tools and initially focus on IPMICFG. With CLI tools you can access some very powerful features of IPMI and it’s a quicker, more efficient way than logging into a web GUI, for example. The nature of command line interfaces means that you can quickly type commands and get an output for multiple systems. This can be used remotely too, using out of band tools such as SMCIPMITool (we’ll be focusing on this in Part 3).
IPMICFG
IPMICFG, which is a shorthand for IPMI Configuration, is a utility from Supermicro. From the name, you can guess it’s used to configure and check many IPMI options such as network config, user management, asset tagging, event logs and more. There are also maintenance features such as monitoring tools.
There are a variety of ways to use IPMICFG, but the tool must be run locally on the server via the operating system or through a pre-OS environment such as DOS or EFI Shell using a USB thumb drive. There is no need to install any application for IPMICFG, just download the files which contain the executable.
Unless you have SSH (Linux) or RDP (Windows) access to a server, you cannot use IPMICFG remotely. With remote access to the OS, however, you could download and launch IPMICFG. Therefore, this tool is dependent on having local hardware access or having an OS to remotely login to.
To get started with IPMICFG, it needs to be downloaded from Supermicro via the following link: https://www.supermicro.com/wdl/utility/IPMICFG/. Once extracted, the download contains all versions (DOS, Linux, UEFI, Windows) and the usage and commands are the same across all formats.
How to launch IPMICFG
In this example we will be using the UEFI shell, for which we need a USB drive formatted in FAT32, the IPMICFG files downloaded, and the USB plugged into the server.
Once this is ready, we can boot the server into the UEFI shell and launch IPMICFG utility. This is usually done by pressing F11 to invoke the boot menu during POST on a Supermicro server.
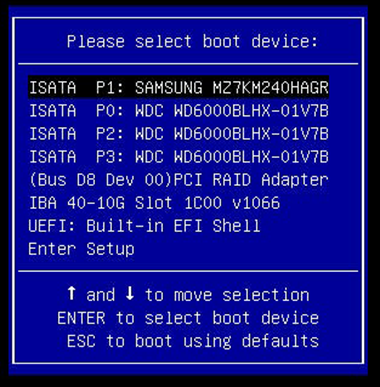
Supermicro boot menu
In the UEFI shell we need to select the USB drive from the mapping table. Usually this will be “fs0:”, as seen in the below screenshot, however this may vary depending on system devices.
You will need some knowledge of command line shell commands to navigate directories etc. In the below screenshot I used the UEFI shell to navigate to the IPMICFG directory, where you can see the IPMICFG.efi application. This can now be executed from here simply by typing IPMICFG.efi and adding command parameters.
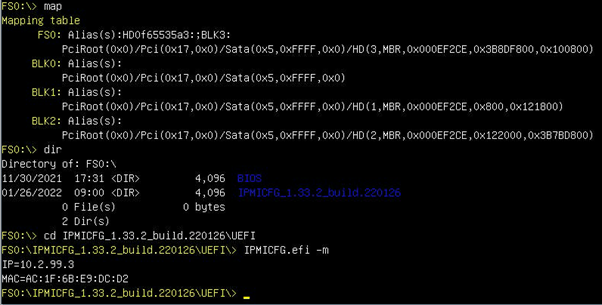
Navigating the UEFI Shell and running a command to see the IPMI address
DOS follows a very similar procedure; a DOS bootable pen drive is required (you can use something like https://rufus.ie/en/ to create one) then boot from the USB, and again navigate to the IPMICFG DOS folder to launch the tool from the command line.
For Windows and Linux, the executable command line is also included in the IPMICFG download. Again, it is a case of navigating to wherever you placed the files in the OS and launching from a command line tool such as Terminal or SSH in Linux, or the Command Prompt in Windows, but note it must be run with Administrator level privileges.
Using IPMICFG
Ok so now that we have the IPMICFG downloaded and ready to use, let’s see what we can do with it. The tool can be used by navigating to the folder where you downloaded and extracted the files. You can then run the executable followed by a parameter. For these examples we will be using an Administrator level command prompt in Windows.
The launcher file is called IPMICFG-Win.exe so you would type this in, followed by a parameter. A handy tip is to simply run ‘-help’ to see the full list of available commands.
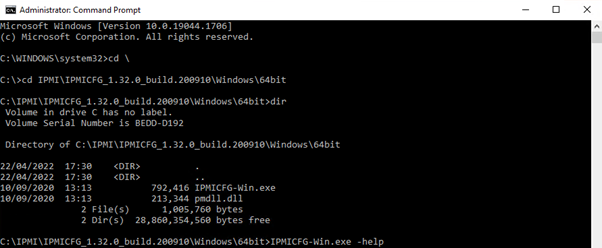
Navigating to the IPMICFG downloaded files and running the "Help" command
Network configuration
Checking and setting the IPMI IP address details is likely to be one of the first use cases of IPMICFG. You can use the below command parameters to check and set various settings related to this. In each of these you would type IPMICFG-Win.exe followed by the command such as:
IPMICFG-Win.exe -m
-m Shows IPv4 address and MAC address
-m <ip> Sets IPv4 address (format: x.x.x.x)
-k Shows Subnet Mask
-k <mask> Sets Subnet Mask (format: x.x.x.x)
-dhcp Gets the DHCP status
-dhcp on Enables the DHCP
-dhcp off Disables the DHCP
-g Shows a Gateway IP
-g <gateway> Sets a Gateway IP (format: x.x.x.x)
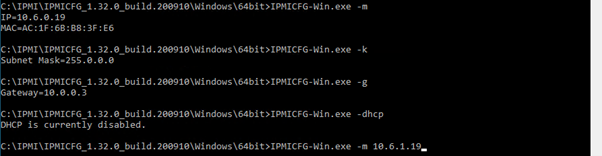
Commands to check the IPMI Network config and set the IP address to 10.6.1.19.
Power control
There are two power options available, -reset <index> and -soft <index>. These will invoke a server reboot and shutdown respectively. The <index> refers to the boot device that must be specified for each command. So, if we wanted to reboot and make sure the server boots to the BIOS, the command would be:
IPMICFG-Win.exe -reset 4
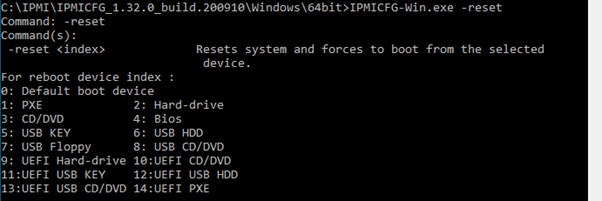
IPMICFG reset and shutdown options
Factory reset
A useful command which may be needed is to reset IPMI default settings back to factory default. It may come in handy as a troubleshooting step if there are any issues with the BMC management controller. The available command parameters are below.
-r Performs a BMC cold reset.
-fd <option> Resets to the factory defaults without preserving configurations.
option: 1 | Preserves User configurations
option: 2 | Restores to factory default and default password
option: 3 | Sets user defaults to ADMIN/ADMIN
-fdl Resets IPMI to the factory default. (Clean LAN).
-fde Resets IPMI to the factory default. (Clean FRU & LAN).
There are further options available depending on what is required, for example IPMI can be factory reset but with all settings preserved as well as options to wipe the LAN and FRU settings (we will talk more about FRU in the next section). Note: the IPMI IP address may change using this option, and certainly will if you have a static IP set and choose the Clean LAN option.
FRU
The FRU entries are a way to store and pull asset information for each server. These consist of part codes, serial numbers, manufacturer information and asset tags. This helps with inventory management as well as asset information (product names and serial numbers). At Boston we populate these fields in each server prior to shipping but they can be edited using IPMICFG and the following commands are applicable.
-fru info Shows information of the FRU inventory area.
-fru list Shows all FRU values.
-fru cthelp Shows chassis type code.
-fru help Shows help of FRU Write.
-fru <field> Shows FRU field value.
-fru <field> <value> Writes FRU.
-fru backup <file> Backs up FRU to a file <Binary format>.
-fru restore <file> Restores FRU from a file <Binary format>.
-fru tbackup <file> Backs up FRU to a file <Text format>.
-fru trestore <file> Restores FRU from a file <Text format>.
-fru ver <v1> <v2> Gets/Sets the FRU version. (<v1> and <v2> are BCD-format)
In the below image you can see how to list the entries in FRU as well as create a new entry in the ‘Product Name’ category. To change FRU fields, you need to use the abbreviated code as seen after using -fru list. For example, PN is used to change the Product Name. For this the command is:
IPMICFG-Win.exe -fru PN Test
The new Product Name 'Test' can be seen in the new FRU list below.
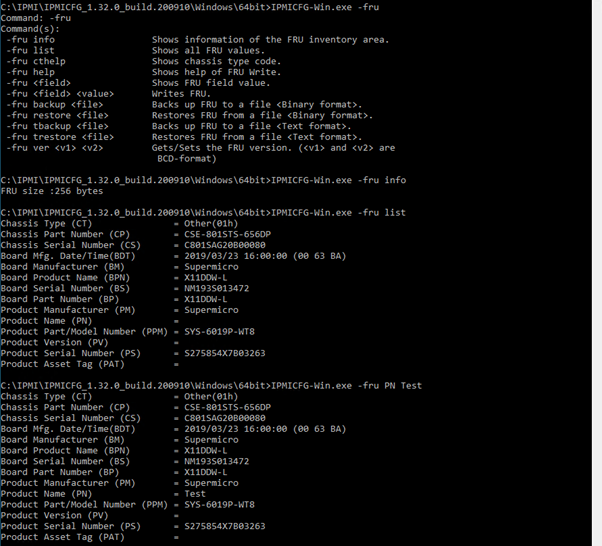
IPMICFG FRU entries
System event log
It’s possible to view the system event logs in the command line too, with the ‘-sel’ command. Here we can see all reported events in the server as well as clear the list if required.
-sel info Shows SEL information.
-sel list Shows SEL records.
-sel del Deletes all SEL records.
-sel raw Shows SEL raw data.
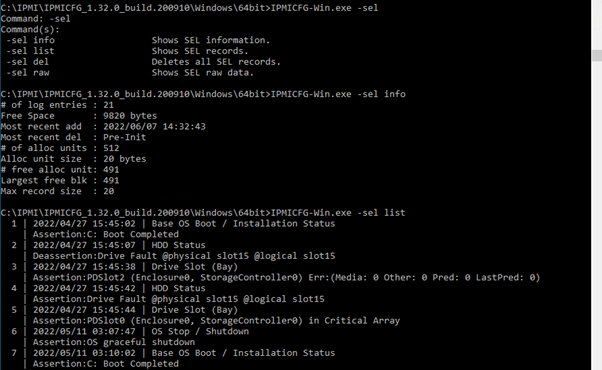
System event log in IPMICFG
User management
Security is very important when creating IPMI access, so why not set up multiple users with restricted access? This way you can have user’s login but not have full administrator rights. Below are the main commands that can be used here.
-user list Lists user privileges.
-user help Shows a user privilege code.
-user add <user id> <name> <password> <privilege> Adds a user.
-user del <user id> Deletes users.
-user level <user id> <privilege> Updates user privileges.
-user setpwd <user id> <password> Updates a user password.
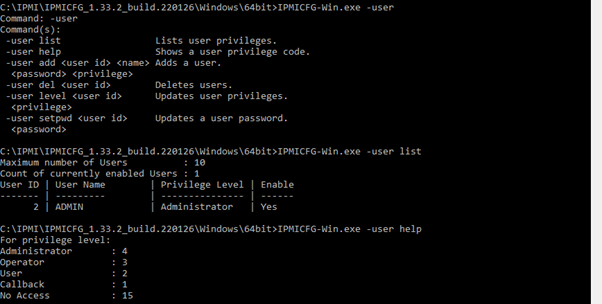
Viewing the IPMI user list
To create a user you need a free slot - up to a maximum of 10 can be used. From the above screenshot there is only one user in slot 2 so we can create one in slot 3. The command to create a user with Administrator levels would need ‘-user add <user id> <name> <password> <privilege>’ so we could use:
IPMICFG-Win.exe -user add 3 ADMIN2 Password 4
In the below example I have created a couple of new users: one new Admin and a 'Operator' level user.
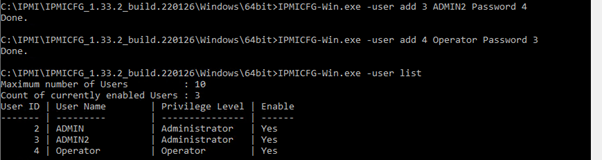
Adding a user with IPMICFG
The privilege levels have the following access rights:
Administrator: 4 – Full control.
Operator: 3 – Can view all configuration settings but cannot make changes. Can mount ISO’s and launch KVM.
User: 2 – Can login and view sensors and event logs, cannot view any other configuration options or make any changes.
Callback: 1 – I couldn’t see any Supermicro documentation for this privilege level, it doesn’t allow any control so perhaps it is for connectivity tests only.
No Access: 15 – User created with no access. Likely here as an option to fill out all 10 IPMI user spaces to block additional users from being added.
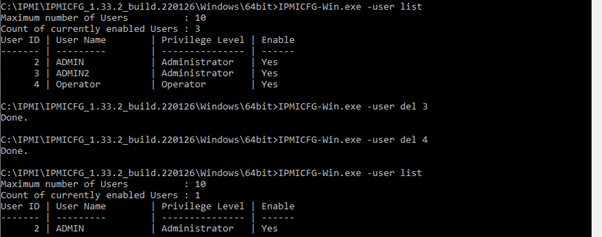
Similarly, we can delete users with the ‘-user del’ command. To delete both newly created users we use:
IPMICFG-Win.exe -user del 3
IPMICFG-Win.exe -user del 4
As shown below, 3 and 4 are the user IDs of each new user.
In summary, the features I have shown so far are what I consider the main useful config options of IPMICFG but be sure to run the ‘-help’ command to see the full list of what’s possible here! You may find some other useful options, such as controlling fan speed modes and backing up or restoring IPMI settings.
Conclusion
The command line based IPMI utilities are powerful tools for server management. Hopefully this guide has given you a good starting point for using IPMICFG. My advice would be to have a play around with the commands list to see what else each tool can do. It’s certainly something that will speed up server administration!
For further reading on IPMI you can check out Part 1 in this series: IPMI Setup and Web GUI , as well as other articles in the links below. Look out for Part 3 which will be about SMCIPMITool, a utility which can do everything mentioned in this guide but with the added functionality and benefit of remote access, independent of the operating system.
To learn more about servers with IPMI solutions and even test drive a solution yourself, please get in touch by emailing [email protected] or call us on 01727 876100 and one of our experienced technical engineers will gladly guide you through building the perfect solution just for you.
Author:
Sukhdip Mander
Field Application Engineer, Boston Limited
Downloads
https://www.supermicro.com/wdl/utility/IPMICFG/
Further Reading
https://www.boston.co.uk/blog/2022/02/09/supermicro-ipmi-how-to-series-part-one.aspx
https://www.boston.co.uk/blog/2019/07/24/ipmi-best-security-practices.aspx